What is an SSL certificate?
SSL stands for “Secure Sockets Layer”, a protocol that enables the encrypted and secure transmission of information. With an SSL certificate, you can therefore protect the data of your website users by preventing third parties from intercepting and reading the transmitted information.
What are SSL certificates used for?
Every time we visit a website, our browser and the server on which the website is hosted exchange data with each other. The most sensitive data includes the user’s details and credit card information (if it is an e-commerce site). If this exchange is not done in a secure manner, there is a possibility that the data may be intercepted by unauthorized third parties and used for illegal purposes.
The following means are used to prevent the risk of cybercrime:
- the HTTPS protocol
- sSL (Secure Socket Layer) technology
Thanks to the issuance of an SSL certificate by a certification authority, the information exchanged between the browser and the server is encrypted, making it virtually impossible to attack.
In the eyes of users, a domain with an associated SSL certificate is a guarantee of authority and reliability.
Is an SSL certificate mandatory?
Is an SSL certificate mandatory for all websites? The answer is no, SSL is not mandatory, but its use is highly advisable for a number of reasons.
As we have seen, the SSL protocol guarantees the reliability and security of a website by encrypting the information and messages exchanged on the Internet.
This is particularly important for websites that sell products online. With an SSL certificate, customers are protected and secured during transactions and when exchanging sensitive data. This increases the likelihood that they will make a purchase.
Another aspect of fundamental importance concerns Google, the world’s most famous search engine. For some time now, Google has been considering the use of HTTPS or SSL as a ranking factor. Since October 2018, Google Chrome, Google’s browser, has been pointing out unsecured websites because they do not have an SSL certificate, thus mandating the use of HTTPS or SSL on every website.
How do I recognize a website that uses an SSL certificate?
To recognize a website on which an SSL certificate is active and correctly installed, you must pay attention to the address of the website in the navigation bar of the browser.
- Sites that begin with “http://” are not secure because they do not have an SSL certificate: They transmit data in plain text and do not guarantee visitors a secure connection.
- Pages beginning with “https:// ” are secure because they have an SSL certificate, which enables them to transmit encrypted data that cannot be understood by third parties.
In addition, websites that use an SSL certificate can be recognized by a padlock to the left of the web address.

Which SSL certificate should I choose?
SSL certificates are issued by accredited certification authorities. In some cases, they are also responsible for evaluating the website of the company applying for the SSL certificate.
SSL certificates are not all the same, there are different types of certificates and each guarantees a different level of security.
There are three main types of SSL certificates:
- Domain Validated (DV)
- Organization Validated (OV)
- Extended Validated (EV).
- SSL Domain Validated (DV) certificate: is the cheapest and fastest option, as it does not require a detailed check; the certification authority only checks whether the applicant is actually the owner of the domain.
- Organization Validated (OV) SSL certificate: requires a longer waiting time as it is issued after a thorough analysis of the applicant company. It is the best certificate for businesses and small e-commerce websites to ensure secure transactions for users.
- The Extended Validated SSL Certificate (EV): guarantees maximum security for the identity of the website and the reliability of the company. This type of certificate is easily recognizable by a green bar containing the name of the applicant company. These features make the EV SSL certificate the best choice for large e-commerce sites and companies with a strong brand identity.
Regardless of the SSL variant chosen, we can always be sure that we will find https:// (instead of http://) in the URL of the website. We can be sure of a secure redirect to the website.
Swizzonic.ch offers all types of SSL certificates:
- Wildcard SSL certificates to protect subdomains and domains
- SAN/UCC SSL certificates , with which several domains of the same applicant can be protected with a single SSL certificate.
How can I generate the CSR and start issuing the certificate?
After purchasing an SSL certificate, you must first generate the CSR file and the private key (KEY) in order to link the certificate to the domain and receive it.
There is a tool for generating the CSR file in the Swizzonic customer area, so follow these steps
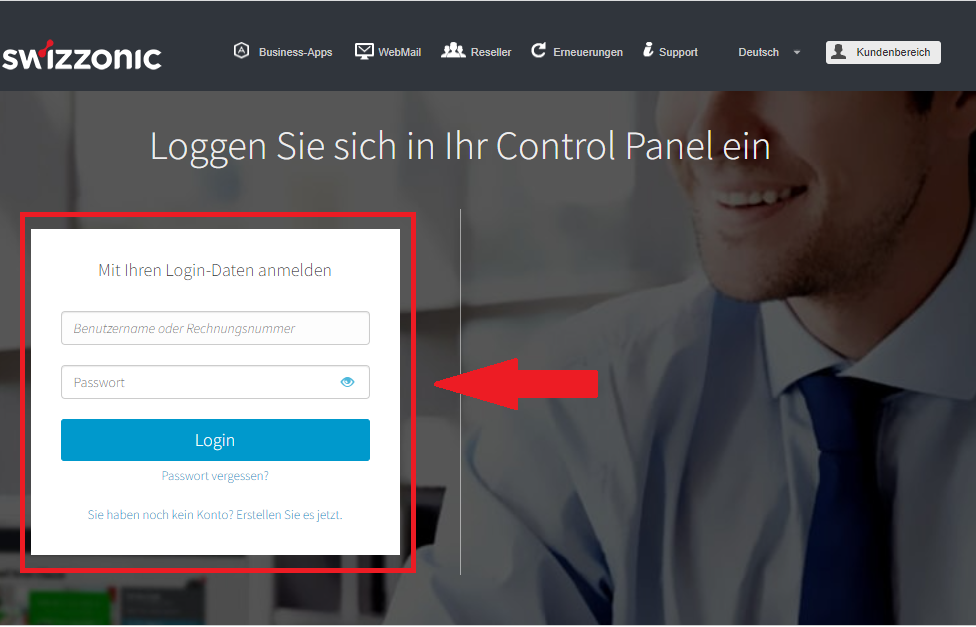
Log in to the customer area by entering your credentials (If you don’t remember how to do this, click here)
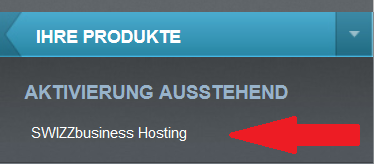
Click on the SSL certificate to be activated in the menu on the right-hand side of the control panel, in the ACTIVATION PENDING section.

Click on the our link displayed in the text of the page

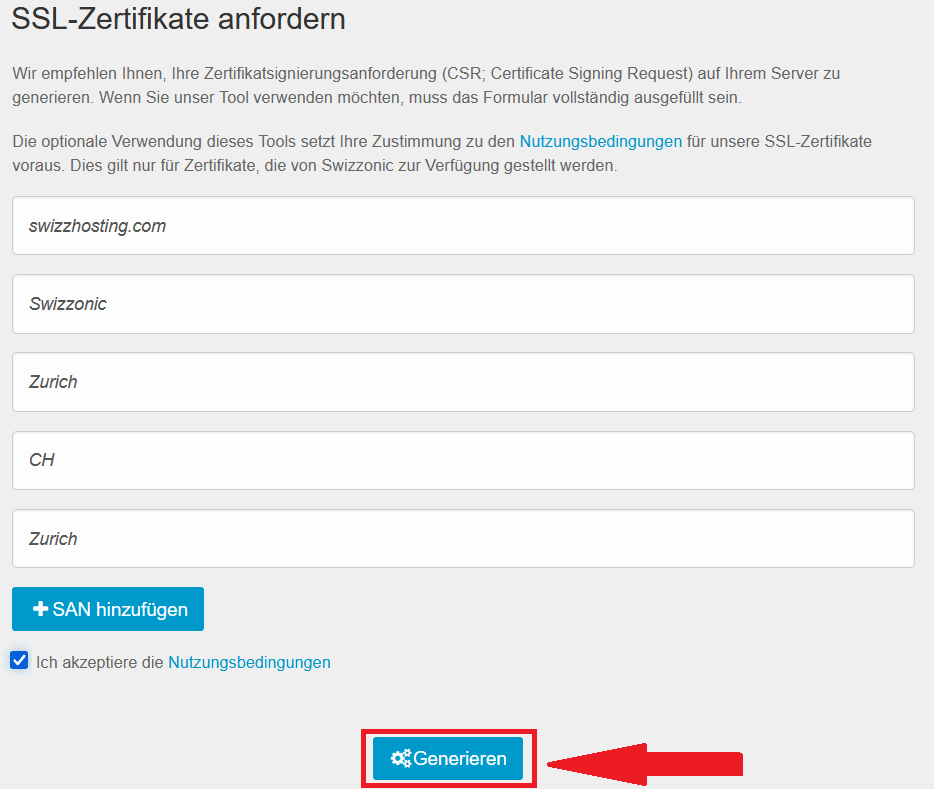
Fill in the form, starting with the domain or subdomain to which you want to assign the SSL certificate, the exact name of your company (or first and last name in the case of a natural person), the city, the country code (e.g. CH for Switzerland) and the province. Accept the conditions and then click on the GENERATE link to continue.
You will be prompted to automatically download a zip file containing the two files required to apply for and use your SSL certificate. Proceed with the download

Save this file in a safe place. You must keep it for the duration of the SSL certificate.
If the private key is lost or deleted, the SSL certificate must be reissued in order to install it.
Unzip the files into a folder.

The two files have these properties:
Files .csr
This is the file with which the request to issue the SSL certificate to the Certification Authority is sent
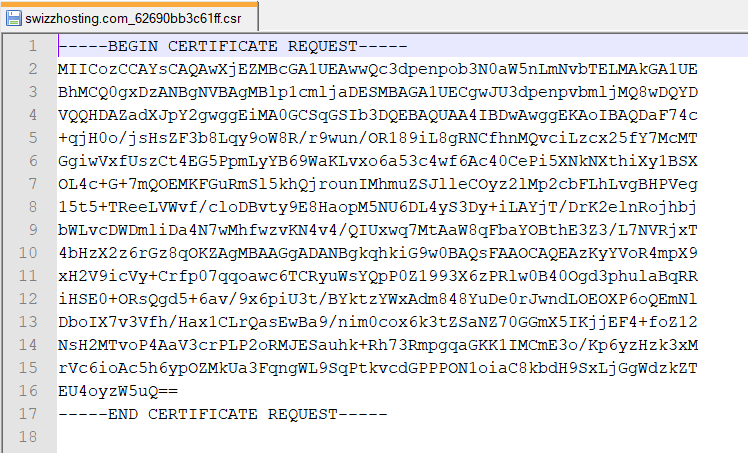
The CSR file is enclosed in two lines like this:
—–BEGIN CERTIFICATE REQUEST—–
—–END CERTIFICATE REQUEST—–
Files.key
This is the private key that is required to install the SSL certificate once it has been issued.
The KEY file is enclosed in two lines like this:
—–BEGIN RSA PRIVATE KEY—–
—–END RSA PRIVATE KEY—–
Open the file with the extension .csr with a text file viewer (e.g. Notepad under Windows).
Select the entire content of the file (including the first and last dotted line) and copy it (CTRL C or command C)
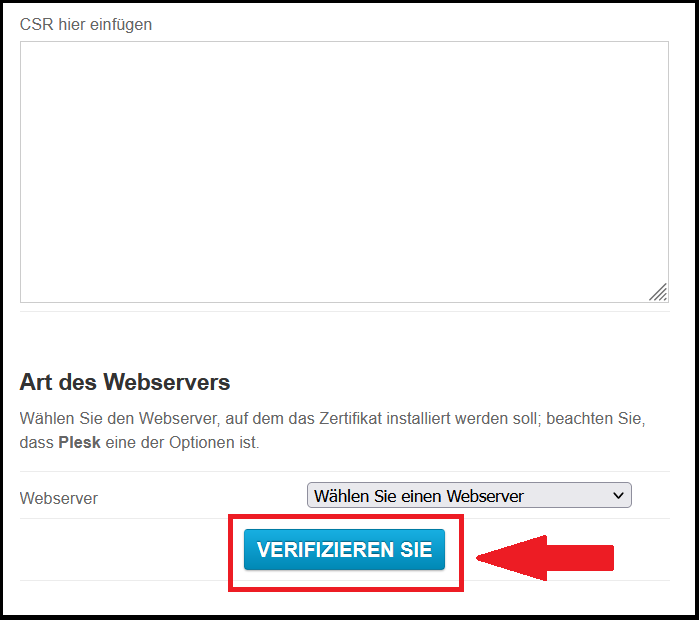
Enter the copied text on the page for activating the SSL certificate (CTRL V or Command V), select the web server (cPanel for swizzhosting) and click Verify.
Now select the desired type of validation:
- Automatic DNS validation: visible and selected by default only if the domain uses Swizzonic’s authoritative DNS. We recommend that you do not change this setting and continue in this mode.
- Validation by email: you must select one of the existing email addresses to which you will receive a confirmation email from the Certification Authority
- Manual DNS validation: you must save the details of the proposed record, which you must configure after starting the request.

Enter the remaining details, check the consent box and click Send.
You will receive instructions by email from the authority that will carry out the relevant checks to issue the certificate.

The issuing times may vary depending on the type of certificate requested and the correctness of the data entered. We recommend that you always enter up-to-date and correct information about the holder’s company, especially in the case of OV and EV SSL certificates.
How do I install the SSL certificate?
SSL certificates provide security for your website and your online communication.
In this article, we will show you how to install the SSL certificate that has already been issued. If you have not yet created the CSR (Certificate Signing Request), follow the instructions How can I create the CSR and start issuing the certificate?
Log in to your customer area with your access data (if you no longer know how to do this, click here).

Select the SSL certificate to be activated (top right in the section ACTIVATION PENDING)

Download the .CRT file using the download icon

Open your control panel
Click on the SSL/TLS icon in the Security section.

Select the link: Manage SSL websites

Select the domain for which you want to install the SSL certificate; copy the entire text of the certificate (.CRT) and the private key (.KEY) and paste them into the corresponding fields.
Click on Install certificate to complete the installation. The SSL certificate will be recognized after a few minutes.
If you go back to the Manage installed SSL websites section and click on Details, you will find the installed certificate

What is a Let’s Encrypt certificate and how does it work?
In the following article, we will explain to you exactly what the Let’s Encrypt SSL certificate is and how it works.
As we all know, SSL is a cryptographic protocol that is used to secure communication from the source (server) to the recipient (the customer’s browser). https://it.wikipedia.org/wiki/Transport_Layer_Security
Let’s Encrypt is a Certification Authority (CA) that issues free Domain Validated (DV) certificates with a validity period of 90 days.
The certificate issued by Let’s Encrypt has the same properties as the DV SSL certificate.
The integration and automation of Let’s Encrypt on the cPanel platform is done via a special plugin that allows you to
- request and install a Let’s Encrypt SSL certificate, for any configured domain or subdomain that does not have one or one of the following:
- self-signed
- issued by Let’s Encrypt, but expired
- issued by Let’s Encrypt, valid but with an expiration date of less than 7 days
- Renew your Let’s Encrypt certificate before it expires
The SSL check is performed automatically and at certain intervals, so it may take some time (even a few hours) for the certificate to be configured for a new website. The time it takes to issue a certificate may also depend on the availability of Let’s Encrypt resources and on a number of restrictions imposed by the CA itself (available at: https://letsencrypt.org/docs/rate-limits/ ).
These restrictions can be briefly summarized as follows:
- Maximum of 20 certificates per week for subsites of the same domain.
- Maximum 5 duplicates of certificates.
- Maximum 5 requests per user, per hostname, per hour
How to get the Let’s Encrypt certificate and where to view it?
The certificate request/installation/renewal process is fully automated:
- the domain/subdomain is configured in CPanel
- the domain/subdomain is directed to the Linux hosting platform with CPanel
- the automatic SSL certificate check is activated (this option is activated by default for all hosting packages)
- the domain/subdomain is included in the SSL check (this option is enabled by default for all domains/subdomains configured on the hosting service)
If you are using services such as external CDN/PROXY or if you have configured an AAAA record (for IPv6) in your DNS zones, Let’s Encrypt cannot be installed for your domain and you would need to consider purchasing one of the SSL certificates described in more detail on our website.
The SSL certificates installed for the domain can be viewed in CPanel, in the SSL/TLS section:
Access to your CPanel hosting

Click on SSL/TLS in the Security section.

Select the Manage SSL websites option.

Click on Details to view the certificate.

How do I renew my SSL certificate?
SSL certificates purchased through our website are valid for one year.
To renew the SSL certificate, it is necessary to execute the renewal order and request the issuance of the renewed SSL certificate from the certification authority.
Renewal order
From 30 days before the expiration date of the SSL certificate, you can submit a renewal request via the Control Panel:
by clicking on the Renewals link

or by clicking on the“Renew” button next to the name of your certificate

Then follow the purchase process.
Once the order is completed, you can request the issuance of the renewed SSL certificate from the certification authority within a few minutes via the Control Panel.
Requesting the issuance of a new SSL certificate
You must createa new CSR/KEY pair, send the renewal request to the certification authority and perform again the validations required for the type of SSL certificate you wish to renew.

It is therefore necessary to start the renewal process before the expiration date of the current SSL certificate, especially if it is an OV or EV certificate.
Once the renewal is complete, click on the corresponding link in the Control Panel to obtain the new SSL certificate.

To generate the new CSR and KEY and issue the new certificate, you can follow the steps below: How do I generate the CSR and start issuing the certificate? and How do I install the SSL certificate?

In order to speed up the renewal process of OV and EV SSL certificates, it is necessary that the data entered when applying for the SSL certificate is the exact data of the holder (company name and data must be entered in full as they appear on the Chamber of Commerce certificate); in addition, this data must match that contained in the public lists checked by the certification authority.
The name and address must correspond exactly to the information provided when applying for the certificate.
Automatic redirection from HTTP to HTTPS
With SwizzHosting you can set up the redirection from HTTP to HTTPS quickly and automatically.
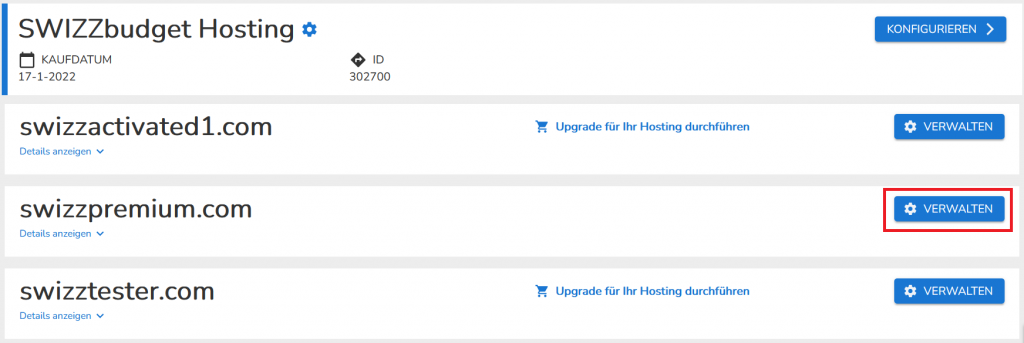
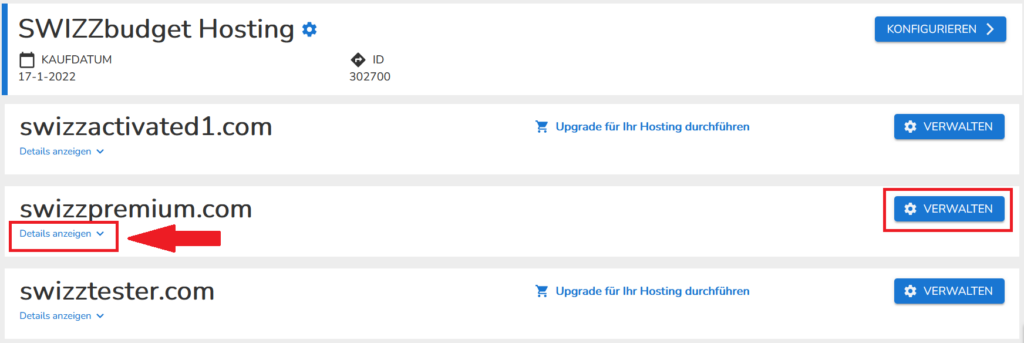
Go to your Control Panel and click on the activated hosting package.
Select the Show details option.
Click on the HTTPS/SSL setting button.

Activate the option Forced access to HTTPS and close the pop-up window

HTTP-HTTPS redirection is automatically activated for all domains/subdomains that are configured in the Control Panel and point to the Linux hosting platform.

If problems occur on your website after you have activated forced access to https, check your .htaccess file to make sure that you have not already configured such a redirect.
If problems occur, try deactivating forced blocking or temporarily renaming your .htaccess file
